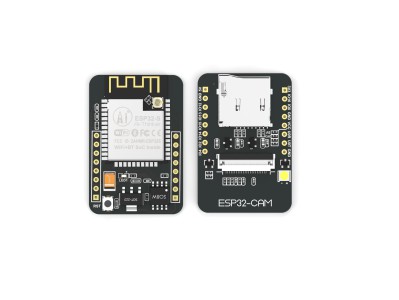
前文要测试网络调试助手,手头正好有个ESP32一直没有试过。这次正好拿来试玩一下。
一、ESP32官网查看
官网:ESP32官网
这款最小系统开发板搭载了乐鑫最新的系统级芯片 ESP32, 支持 Wi-Fi 和蓝牙功能,具有丰富的外设,能够让开发者尽情发挥想象力进行二次开发!
二、Ubuntu系统下ESP32开发环境的搭建
参看:Ubuntu系统下ESP32开发环境的搭建
1、安装交叉编译工具链依赖的环境:
sudo apt-get install git make gcc libncurses5-dev flex bison gperf python-serial
2、创建ESP32专用的工作目录:
sudo mkdir /esp32
3、设置文件夹的归属为当前用户:
sudo chown user:user /esp32
4、创建三个文件夹:
crossTools、demos、sources分别保存交叉编译工具链、样例和SDK源码:
cd /esp32
mkdir crossTools demos sources
5、进入crossTools文件夹,下载官方的交叉编译工具:
注意,需要查看你的linux是32位还是64位的。
在linux终端输入 getconf LONG_BIT 命令
如果是32位机器,则结果为32
[root@localhost ~]# getconf LONG_BIT
32
如果是64位机器,则结果为64
[root@localhost ~]# getconf LONG_BIT
64
Linux(x32):wget https://dl.espressif.com/dl/xtensa-esp32-elf-linux32-1.22.0-59.tar.gz
Linux(x64):wget https://dl.espressif.com/dl/xtensa-esp32-elf-linux64-1.22.0-59.tar.gz
6、 解压文件到当前目录下:
tar -xzvf xtensa-esp32-elf-linux64-1.22.0-61-gab8375a-5.2.0.tar.gz
三、修改环境变量
1、将解压后的交叉编译工具连添加到系统的PATH环境变量中
sudo vim /etc/profile
2、在最后面添加交叉编译工具链bin文件夹的目录
export PATH=$PATH:/esp32/crossTools/xtensa-esp32-elf/bin
3、然后更新一下profile文件,使之生效
source /etc/profile
4、检查是否安装成功
xtensa-esp32-elf-gcc -v
如果看到有版本信息显示,说明已经安装成功
5、可以看到使用的gcc版本为4.8.5
针对的目标机器格式为xtensa-esp32-elf,支持编译的源文件有C和C++,支持的线程模式是单线程single,整套的交叉编译工具链是使用crosstool-NG工具制作,如果不怕折腾,用户也可以自己制作一个新的
$ xtensa-esp32-elf-gcc -vUsing built-in specs.COLLECT_GCC=xtensa-esp32-elf-gccCOLLECT_LTO_WRAPPER=/esp32/crossTools/xtensa-esp32-elf/bin/../libexec/gcc/xtensa-esp32-elf/4.8.5/lto-wrapperTarget: xtensa-esp32-elfConfigured with: /home/vagrant/crosstool-NG/.build/src/gcc-4.8.5/configure --build=i686-build_pc-linux-gnu --host=i686-build_pc-linux-gnu --target=xtensa-esp32-elf --prefix=/home/vagrant/crosstool-NG/builds/xtensa-esp32-elf --with-local-prefix=/home/vagrant/crosstool-NG/builds/xtensa-esp32-elf/xtensa-esp32-elf/sysroot --with-sysroot=/home/vagrant/crosstool-NG/builds/xtensa-esp32-elf/xtensa-esp32-elf/sysroot --with-newlib --enable-threads=no --disable-shared --with-pkgversion='crosstool-NG crosstool-ng-1.22.0-59-g8d95cad' --disable-__cxa_atexit --enable-cxx-flags='-fno-exceptions -fno-rtti' --with-gmp=/home/vagrant/crosstool-NG/.build/xtensa-esp32-elf/buildtools --with-mpfr=/home/vagrant/crosstool-NG/.build/xtensa-esp32-elf/buildtools --with-mpc=/home/vagrant/crosstool-NG/.build/xtensa-esp32-elf/buildtools --with-isl=/home/vagrant/crosstool-NG/.build/xtensa-esp32-elf/buildtools --with-cloog=/home/vagrant/crosstool-NG/.build/xtensa-esp32-elf/buildtools --with-libelf=/home/vagrant/crosstool-NG/.build/xtensa-esp32-elf/buildtools --enable-lto --enable-target-optspace --without-long-double-128 --disable-libgomp --disable-libmudflap --disable-libssp --disable-libquadmath --disable-libquadmath-support --disable-nls --disable-multilib --enable-languages=c,c++Thread model: singlegcc version 4.8.5 (crosstool-NG crosstool-ng-1.22.0-59-g8d95cad)
四、从Github上获取ESP-IDF
可以直接通过gitclone的方式获取ESP-IDF:
git clone –recursive https://github.com/espressif/esp-idf.git
ESP-IDF的目录结构如下:
components:ESP-IDF的核心组件
examples:ESP-IDF提供的实例程序
make:ESP-IDF工程管理目录
tools:ESP-IDF提供的工具集
docs:ESP-IDF相关文档
将esp-idf拷贝到 /esp32/sources
1、将ESP-IDF目录下examples中的hello_world样例拷贝到我们之前新建的demo文件夹中
cp /esp32/sources/esp-idf/examples/get-started/hello_world/ /esp32/demos/ -rf
打开Makefile,发现里面需要一个IDF_PATH的变量
在/etc/profile中添加这样一个环境变量:
export IDF_PATH=/esp32/sources/esp-idf
source /etc/profile
2、配置项目工程,在工程的根目录下使用make menuconfig
进入SDK tool configuration查看交叉编译工具链是否指定正确,已经python命令是否正确安装,ESP-IDF需要你的python属于python2的版本,最好不要实用python3
进入Bootloader config目录,配置bootloader的打印日志显示信息等级为warning
进入Secure boot configuration,开发阶段建议关闭secure boot功能
进入Serial flasher config,指定用于烧写程序的串口设备,一般使用USB转串口的选择/dev/ttyUSB0即可,设置默认的波特率为115200,Flash的SPI模式为DIO,SPI速率为40MHz,Flash的大小为2MB
进入Partition Table设置分区表,为了更好的管理SPI Flash,ESP-IDF引入了分区表的概念,默认使用Single factory app,no OTA制作分区BIN
Component config是对ESP-IDF的内核进行的更加详细的配置
退出make menuconfig的配置界面,保存刚才的配置,将会在工程根目录下新生成一个build文件夹和sdkconfig文件
在工程根目录下输入make all将会编译所有的BIN文件,默认会编译bootloader、partition_table、app文件,并且还会提示如何进行烧写
转自:https://blog.csdn.net/qq_29350001/article/details/79491209


